Tuesday, June 30, 2015

Posh Vanity

Pin It
Now this is a fun and easy process, but it does require some patience or a night when you are going to be up until 2:00 A.M. anyway so you might as well be removing paper from a vanity.  Good thing I had one of those nights!


I'd say it was worth staying up late for this result wouldn't you?  DIY Paint's Crystal Clear Liquid Patina is a wonderful Transfer Medium in addition to being a sealant.  I practiced on a much smaller piece first and when I achieved success had my poster of fancy ladies all ready to go.  Here are the details:  1.  Paint your piece first, mine is painted in Vintage Linen over Prairie Gray.  2.  Distress and seal your entire piece in Liquid Patina.  (You may seal the main body in wax or the Dark and Decrepit  Liquid Patina if you are wanting a more aged appearance, but the surface for the transfer should be sealed in the clear patina.)  3.  Once dry, measure and cut out your poster/paper.  Give it a generous coat of Liquid Patina ON THE PRINTED SIDE.  Immediately lay this coated side down on your surface and with a brayer smooth it out, removing all bubbles.  You may need to wipe up any patina that squirts out from under so check the edges once you are finished smoothing it.  Then walk away from it.  Really.  Don't get in a hurry to remove the paper.


4.  I gave mine a good 12 hours to dry and set itself before I started removing the paper backing.  To do this have a spray water bottle handy.  Spritz and gently rub your fingers over the wet area until the paper begins to roll up.  Then rub and rub and rub until you get all the paper off.  It will take some time or patience so good music or a nice long movie is helpful.   5.  When it first dries it may have quite a haze.  That is either more paper or more likely the dried on liquid patina.  So keep spritzing, rubbing off the patina (you can feel it on your ultra sensitive fingertips)until you feel the super smooth finish.  I kept a soft rag handy to wipe off the patina as it softened and balled up.  This last part takes some time.  6.  Once you have removed, gently, all the patina and paper residue let it dry.  It might not be crystal clear, but it is not super hazy any longer.  There may be some parts that no matter how gentle you might have been did not transfer.  I lost one of the ladies' hat.  If you have painted your piece in a color that will blend into the background this helps hide those spots.  It also helps that my poster print was of a Monet style painting where details were not sharp and clear to begin with.  More forgiving.  7.  Once your piece is dried seal it.  I sealed with the Clear Patina.   I actually did 4 very thin coats and I changed direction, horizontal to vertical, to create a linen or canvas effect.  For a more durable water resistant finish I topped it all off with 2 coats of Aqua Clear, the Heirloom Traditions top coat that I am LOVING!

I chose to line the drawer with some fun paper, added a new fashion forward knob on the drawer and covered the bench seat in a fabric that I found that mimicked the colors in the poster.  TaDa!  A fun transformation!
In the upper right hand corner is a Shop DIY Paint with a red 'affiliate link' button under it.  This will take you to my online shop within Heirloom Traditions.  You can find the Paints and Crystal Clear Liquid Patina within the shop.  And better yet, they have packaged a product for those who are only looking for a Transfer Medium under the "Sealers & Additives" section called 1 Gel Instant Transfer Medium & Decopauge!  There are also other great products that might interest you creatively!

Have a super week!

Linking this up to these parties:


Elizabeth and Co.
Furniture Feature Fridays

Thursday, June 25, 2015

To Learn Something New

Pin It
It always seems like a good idea.  You know, learning something new for my business, until it comes down to crunch time anyway.  I have two chairs, and no before photo so use your imaginations please, with rush seats.  The seats were a bit worse for wear if you know what I mean, but otherwise the chairs were in perfect condition.  Sometimes I feel the need for explaining why I would even buy some of what I buy.  Anyhow, with preps madly under way for Prairie Market (mark your calendars now!), I just kept pushing them back because I knew what dealing with them meant.  Yup, tackling something I had never done before.  And sometimes you just have to decide, do I really WANT to learn something new this week or not.  Obviously I chose not to tackle this right now.  No Thank You!  I will someday, but not this time around.  So then what to do with 2 chairs with less than desirable seats?  Make a bench of course!

And with the Mr.'s help that's just what we did.  I think I like it more than I would have with 2 new chairs.

It is so sturdy with those nice big bolts anchoring it down.  Wouldn't it be cute in a mud room, or for a pop of color on a grand front porch?

It is finished in a color called Peacock and a product from Heirloom Traditions called Aqua Clear.  Heirloom Traditions is the parent company and manufacturer for Debi's Design Diary DIY Paint that I retail.  I can not tell you how much respect and love I have for Paula at HT and Debi at DIY Paint.  They are both so forward thinking and kind and respectful and I could go on forever.  I am able to retail some HT products in my booth and I will be adding Aqua Clear for sure with my next order.  I wanted to work with it before I offered it to you so I could help you with your projects.  I LOVE it a lot.  It is a water resistant finish, not water proof (so don't go putting my bench out in the middle of your rose bed in the rain).  But a covered porch should be just great!


So here is another lovely offering for the Prairie Market sale on July 17 & 18 in Gretna at the Big Red Barn by the Middle school.  We are all working feverishly to finish up some great products for you.  I tell you, we are really going outside the box with some creative endeavors this year.  You need to mark your calendars.  While you are at it, you can follow me on Facebook by pushing that handy little "F" button on the sidebar.  And though there is no button for it (because I never thought I would join) you can also follow me on Instagram (TWICENICEFURNITURE), and Prairie Market is also on Facebook with lots of pre-sale photos (Prairie Market Gals) and you should follow that too!  I will stop because I am starting to sound bossy again.

Have a super weekend!  It's almost here so hang on!
Deb

Wednesday, June 17, 2015

Another Petite and Sweet

Pin It
How about two in a row that are sweet and petite?  Of course you can handle it!

I forgot the before photo of this one.  But it was just the shell of a small side table/bookshelf in battered brown.  Almost all of my pieces are battered.  The Mr. calls the workshop the shelter for abused furniture.  It was missing it's only shelf too, but not to worry. Viola`.

We made it a new shelf out of one I found floating around the thrift store.  There was nothing wrong with the back of this piece, but I thought it might need a bit of pizazz.  Since I follow Sweet Pickins blog and have watched Shauna's tutorial I gave it my own shot on some cedar boards I had around.

Paper napkins modge lodged on the boards.  Since the boards were new to begin with I lightly sanded off the roughness and gave them a wash of paint in Weathered Wood, one of the new DIY Paint line paints.  Love that color btw!


Is it considered an addiction if I confess that I have since gone out and bought 18 more packages of pretty napkins?  I kid you not.  I just love seeing the wood peek through them.


The colors used for this little sweetie are Vintage Linen and Petticoat Pink.  DIY Paint line of course.
One of my partners in the Prairie Market just finished creating a beautiful dresser in these very same colors for the sale.  Look for both pieces sitting together at the sale.  You could make some young lady very, very happy!!

Happy Hump Day!
Deb

Thursday, June 11, 2015

Petite Sweet

Pin It
There are some pieces that are frequently requested by the ladies who shop our sales, my booth, and the store where I consign some furniture.  Here are some of the descriptors they use, "storage, narrow, petite, versatile, not too wide, smallish, and fun".  They are wanting something for the landing spot in their home, be it near the front door or the back door drop zone, everyone needs something that is non-intrusive to set the keys, purse, or mail on, and to store a few items in.  I am always on the lookout for those types of pieces, which don't seem to grow on trees!

Meet Petite Sweet.
She meets most, if not all, of the descriptors above.  This cute little cabinet was a very lucky find.  She had dings, but was sound and clean.
I love any piece that allows me to store some items out of sight, but within arms reach.  This is narrow enough to serve as a side table between a couple of chairs, or in a small entry hall as a great place to put your purse, add a basket for all the car keys, set the mail down, well you get the idea.  What would you use her for?
Love the pretty lines and details on her.  This color is Gypsy Green, a new DIY Paint color.  I'd say Debi Beard nailed this color perfectly!  Love it!
Why I can't keep all these pieces is beyond me, but the Mr. moved it to the "getting ready for the Prairie Market pile" and told me to slap a price tag on it.  So that's where it will go.  Bummer for me, bonus for you all!

Hope you are having a fun filled Summer!

Deb

Wednesday, June 3, 2015

Inspiration

Pin It
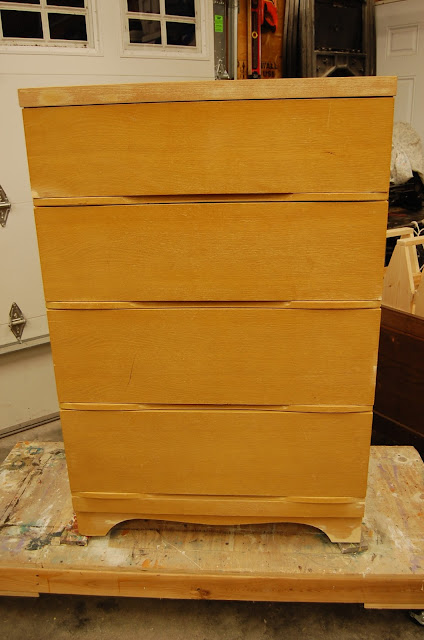
Inspiration comes from many places, and sometimes out of the blue.  I got a really good deal on a nice, clean mid-century modern blond oak dresser.  They don't seem terribly popular, go figure.
Here it is in it's before glory.

A little rough and a lot plain jane.  It would have worked for another subway dresser I told myself.  I could try some really fun transfer graphic on it I thought.  I just could not get going though.  A cold start and just no get up and go when it came to this piece.  I was not inspired to do much of anything with it, and nearly took it off to re-donate.  So I worked on other projects and shoved it in the corner.
Then it hit me.....
This rather funky (and off-season) oil cloth that I use for a drop cloth on my work table caught my imagination.  Houndstooth.  I even had a houndstooth stencil.  And so the rather plain mid-century dresser got 'all dressed up' and is ready for an official release.

She's classic, she's clean, she's still got a bit of that 50's sass because she's sporting some snappy houndstooth.  You know, in their bland blond state these dressers are so unappealing.  But if you put some color on them, shazam!  They are great canvas' for some pretty creative moments.  The storage is fabulous in this piece.  The drawers are solid, dove-tailed, clean and deep.
Dizzy, I'm so dizzy my head is spinning'... It really does make you dizzy.  And if I'm honest I was extremely happy when I painted that last row.  Just keepin' it real...
And just so I don't cause any permanent eye damage I kept it solid on the sides and top.  You are welcome!

All DIY Paint products:  Black Velvet and Beadboard, paints.  I did not prime, but I tested for tannin bleed through and decided to clear seal the wood prior to painting to avoid the wood tannins from seeping up.  I used Heirloom Traditions Aqua Clear in Satin to seal.  This was a new to me product, but man I do believe I am going to love this.

Have a wonderful week friends!
Deb

You can find DIY Paint in my booth #43, at The Brass Armadillo in Omaha, or shop online from my affiliate link.